line-notify-gateway (2)
ใน blog ก่อนเขียนถึงที่มาที่ไปทำไมต้องเอา line-notify-gateway มาแก้ไขเพิ่ม code เข้าไปเพื่อให้สามารถส่งการแจ้งเตือนจาก Alertmanager ไปที่ LINE Notify ได้ สำหรับ blog นี้อยากจะเขียนขยายความวิธีนำมาใช้งานกับ Alertmanager ของ Prometheus เพิ่มเติม
LINE Notify
แต่ก่อนอื่นอยากจะอธิบายว่า ถ้าต้องการส่งข้อความไปที่ LINE Notify เราไม่จำเป็นต้องใช้ line-notify-gateway ที่ผมเขียนถึง เราสามารถส่งการแจ้งเตือนไปที่ระบบของ LINE Notifyได้ผ่าน API ของ Line เอง ยกตัวอย่างถ้าผมต้องการส่งข้อความ “Hello” หา Line account ของตัวผมเอง สามารถทำได้ง่ายๆโดยใช้ cURL จาก command line ตามคำสั่งด้านล่าง
curl -X POST -H 'Authorization: Bearer ${TOKEN}' -F 'message=Hello' https://notify-api.line.me/api/notifyให้แทนค่า ${TOKEN} ด้วย Token ที่ได้รับมาจาก LINE Notify ถ้าหากส่งข้อมูลสำเร็จ Line จะตอบกลับมาว่า
{"status":200,"message":"ok"}และใน Line จะเห็นข้อความตามด้านล่าง

สำหรับวิธีใช้งาน LINE Notify ผมจะไม่เขียนถึงนะครับ ลอง search google ด้วย Keyword “LINE Notify” จะมีบทความมากมายอธิบายเรื่องนี้ไว้แล้ว
Alertmanager Webhook Receiver
ผมเอา line-notify-gateway มาใช้ในส่วนที่เป็นกล่องสีฟ้าตามรูปด้านล่าง

ใน Prometheus เรียกส่วนนี้ว่า Alertmanager Webhook Receiver ทำหน้าที่ในการแปลงข้อมูลการแจ้งเตือนจาก Alertmanager ไปสู่ระบบที่ต้องการ ในรูปแบบหน้าตาที่เราต้องการนั่นเอง
นอกจากนั้น Webhook ของ Alertmanager เองยังมีรูปแบบที่ตายตัว เราไม่สามารถปรับแต่งอะไรได้ ถ้าจะทำต้องเข้าไปแก้ไขที่ source code ของ Alertmanager เอาเอง สิ่งนี้ทำให้เราไม่สามารถเชื่อมต่อ Alertmanager เข้ากับ LINE Notify ได้โดยตรง ซึ่งจะติดสองเรื่องใหญ่ๆคือ ไม่สามารถใส่ค่า TOKEN ของ LINE Notify เข้าไปได้ และถ้าส่งได้ข้อมูลที่ไปปรากฎใน Line ก็จะเป็นข้อมูลในรูปแบบของ JSON format ตัว Alertmanager Webhook Receiver จึงเข้ามาช่วยแก้ปัญหาสองเรื่องนี้
Usage — command line
วิธีที่ง่ายที่สุดในการทดสอบ line-notify-gateway คือ download line-notify-gateway.jar มาใช้ โดยผมได้ upload เอาไว้แล้วใน Github โดย download ไฟล์ชื่อ line-notify-gateway-0.1.4.zip เมื่อ extract ไฟล์แล้วจะได้ไฟล์ชื่อ line-notify-gateway.jar
สมมติเอาไฟล์ไปวางไว้ใน directory /opt/line เราสามารถสั่งให้ line-notify-gateway ทำงานได้โดยใช้คำสั่ง (ต้องติดตั้ง JRE 8 เป็นอย่างต่ำนะครับ)
java -Dlogging.file=/opt/line/line-notify-gateway.log -Dlogging.level.ROOT=INFO -Dline-notify.personal-access-token=${TOKEN} -jar /opt/line/line-notify-gateway.jarให้แทนที่ ${TOKEN} ด้วยค่า Token ที่ได้จาก LINE Notify
ลองทดสอบโดยจำลองค่า JSON message จาก Alertmanager ส่งเข้าไปใน line-notify-gateway
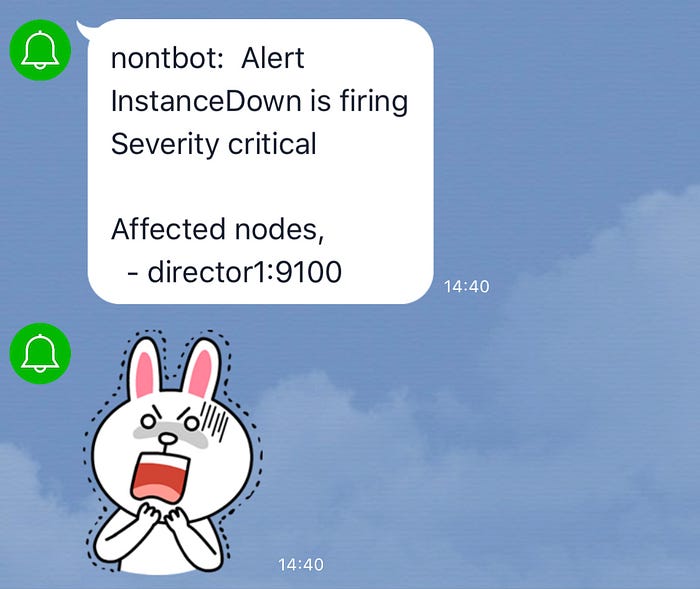
curl -H "Content-type: application/json" -X POST -d '{"receiver":"line-notify-gateway","status":"firing","alerts":[{"status":"firing","labels":{"alertname":"InstanceDown","instance":"director1:9100","job":"ipvs","severity":"critical"},"annotations":{"description":"director1:9100 of job ipvs has been down for more than 5 minutes.","summary":"Instance director1:9100 down"},"startsAt":"2019-06-09T09:12:56.795099989Z","endsAt":"0001-01-01T00:00:00Z","generatorURL":"http://72426f0cd030:9090/graph?g0.expr=up+%3D%3D+0&g0.tab=1"}],"groupLabels":{"alertname":"InstanceDown"},"commonLabels":{"alertname":"InstanceDown","instance":"director1:9100","job":"ipvs","severity":"critical"},"commonAnnotations":{"description":"director1:9100 of job ipvs has been down for more than 5 minutes.","summary":"Instance director1:9100 down"},"externalURL":"http://alertmanager:9093","version":"4","groupKey":"{}:{alertname=\"InstanceDown\"}"}' http://localhost:18081/v1/alertmanager/payloadข้อมูลที่เห็นใน Line จะเป็นตามรูป
ในการเอาไปใช้งานจริงวิธีนี้ไม่ค่อยสะดวกเพราะเราควรทำให้ line-notify-gateway ทำงานเป็น service ใน OS ซึ่งสำหรับ Java เองอาจทำผ่าน Java Service Wrapper แต่เนื้่องจากช่วงหลังมีวิธีที่ง่ายกว่า คือทำผ่าน Container เช่น Docker ผมจึงไม่ได้ทำให้ line-notify-gateway ทำงานผ่าน standalone service แต่ไปทำให้ทำงานผ่าน container แทน
Usage — Docker Container
การใช้งานผ่าน Docker นั้นทำได้ง่ายมาก เนื่องจากผมได้ทำ line-notify-gateway ให้ทำงานบน container ได้ และได้ push image ขึ้นไปบน DockerHub เรียบร้อยแล้ว สามารถใช้งาน line-notify-gateway ผ่าน Docker ด้วยคำสั่งด้านล่าง
docker run -d -p 18081:18081 -e line-notify.personal-access-token='${TOKEN}' --name line-notify-gateway nontster/line-notify-gatewayให้แทนที่ ${TOKEN} ด้วยค่า Token ที่ได้จาก LINE Notify
ในทางปฏิบัติเราเขียน docker-compose ไฟล์ขึ้นมาเพื่อ provisioning monitoring stack ขึ้นมาใช้ในพร้อมกันได้ตามตัวอย่างด้านล่าง
version: '3.6'
services:
    prometheus:
        image: prom/prometheus:v2.10.0
        volumes:
            - ./prometheus:/etc/prometheus
            - type: volume
              source: prometheus_data
              target: /prometheus
        command:
            - '--config.file=/etc/prometheus/prometheus.yml'
            - '--storage.tsdb.path=/prometheus'
            - '--storage.tsdb.retention=30d'
        ports:
            - 9090:9090
        restart: always
        networks:
            - back-tier
        extra_hosts:
            - "director1:192.168.2.101"
            - "director2:192.168.2.102"
    alertmanager:
        image: prom/alertmanager:v0.17.0
        volumes:
            - ./alertmanager/:/etc/alertmanager/
        command:
            - '--config.file=/etc/alertmanager/config.yml'
            - '--storage.path=/alertmanager'
            - '--log.level=info'
            - '--web.external-url=http://alertmanager:9093'
        ports:
            - 9093:9093
        restart: always
        networks:
            - back-tier    line-notify-gateway:
        image: nontster/line-notify-gateway:0.1.4
        environment:
            - line-notify.personal-access-token=${LINETOKEN}
            - logging.path=/logs/line-notify-gateway.log
            - logging.level.ROOT=INFO
        volumes:
            - type: volume
              source: linenotify_log
              target: /logs
        ports:
            - 18081:18081
        restart: always
        networks:
            - back-tier    grafana:
        image: grafana/grafana:6.2.2
        depends_on:
            - prometheus
        volumes:
            - grafana_data:/var/lib/grafana
            - ./grafana/provisioning/:/etc/grafana/provisioning/
        env_file:
            - ./grafana/config.monitoring
        ports:
            - 3000:3000
        user: "104"
        restart: always
        networks:
            - back-tier
            - front-tiernetworks:
    front-tier:
    back-tier:volumes:
    prometheus_data: {}
    grafana_data: {}
    linenotify_log: {}
สำหรับการใช้งาน line-notify-gateway ใน Alertmanager ทำได้โดยกำหนดใน configuration file ของ Alertmanager ยกตัวอย่างเช่น
global:
    smtp_smarthost: 'smtp.email.com:587'
    smtp_from: 'myname@email.com'
    smtp_auth_username: 'myname@email.com'
    smtp_auth_password: 'mypassword'route:
    group_by: [alertname]
    receiver: 'line-notify-gateway'
    group_wait: 30s
    group_interval: 5m
    repeat_interval: 4hreceivers:
    - name: 'default'
      email_configs:
          - send_resolved: true
            require_tls: true
            to: 'op1@email.com, op2@email.com'    - name: 'line-notify-gateway'
      webhook_configs:
        - url: http://line-notify-gateway:18081/v1/alertmanager/payload
          send_resolved: true
เวลาใช้งาน Docker compose เพื่อ provision Monitoring stack ก็ใช้คำสั่งตามนี้
export LINETOKEN=${TOKEN}
docker-compose up -d
ให้แทนที่ ${TOKEN} ด้วยค่า Token ที่ได้จาก LINE Notify
เวลาเลิกใช้งานก็ใช้คำสั่ง docker-compose down โดยข้อมูลที่เก็บไว้จะไม่โดนลบไปตาม container
Building project
สำหรับการ build project ใน Github สามารถทำได้โดยใช้ Maven โดยค่าตั้งต้นจำเป็นต้องมี Docker ทำงานอยู่ระหว่าง build เพื่อสร้าง Docker image
สามารถสั่ง build project ได้ด้วยคำสั่ง
mvn clean packageถ้าไม่ต้องการสร้าง Docker image สามารถ build project ได้ด้วยคำสั่ง
mvn clean package -Ddockerfile.skip